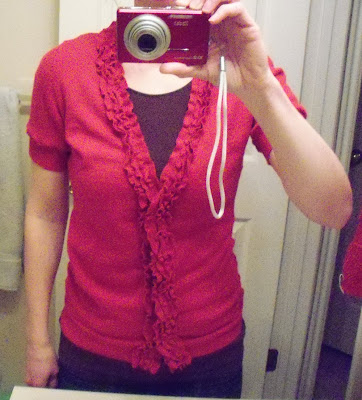
Since it's been WAY too long since I posted something new (we came home from a long weekend to water damage all through our house, it has taken over a month to rip it all apart and re-build---more to come soon!)... I thought I'd post a quick little cardigan re-vamp I did thanks to a post I remembered here at Homemade by Jill! I got a cute sweater/cardigan at a big Layers warehouse sale today, (i had no idea it was so similar to jills!) but when I got home- and actually got to try it on in front of a mirror I realized it was totally big, baggy, and not-flattering. So... I took in the sides, chopped off the sleeves, and voila! Problem solved.
Showing posts with label crafts. Show all posts
Thursday, February 18, 2010
Cardigan re-vamp
Saturday, January 2, 2010
Homemade car-mat for Christmas (nat)
*Just making a note that we are linking up over at the DIY showoff today! So fun to check out everyone elses craftiness! Go check it out!
I decided to get ambitious and make a car-mat for my son this year. I originally just bought a car-mat from ikea but then before I opened it I looked online to remember what kind of images were on it- and realized it is not as cool as I thought. I am sure it would have worked just fine but what's the fun in something that's not homemade right? The problem is I get super excited about something, go buy all the supplies, then have to buy a million more things because I didn't think through everything the way I should have, and then I get half way through and am totally burned out and wish I never started. Live and learn, live and learn. I think overall I am happy with how it turned out and the fact that he was actually really excited about it on Christmas morning, made all the effort totally worth it.
The main goals of this project were
-center the mat around places and things that he knows from his daily life- including... walmart, target, the mall, church, temple, community pool, football stadium, basketball court, our house, grammy's house(complete with hottub in the the backyard), grandma's house, a construction site etc. That means that not everything matches up perfectly and is not all to scale but who's counting!?
-make it last past Christmas Day- the mat itself is all just fabric and can be thrown in the washer if needs be and just folds up to be stored wherever. Any problems can be fixed with a little stitch or two. The places can be changed over time as life changes.
-make it 3-D (2-D? uh pop up? you get the point...) so he can actually play with everything instead of just driving over it all. Everything can be moved around so if he gets bored with the same old set-up he can just create his own.
sooo... here it is!

Once again, adding all the details is what's really fun for me. I experimented with all different ways of making all the buildings and places then at Michaels one day I found the perfect solution! They have these wood cut-outs of different things so I just got a few that I knew I could transform to look like different places, colored them in, attached small blocks of wood I had on hand on the back with hot glue to make them stand up etc. This church and temple were castles that had big flags on top of all the piers, i just cut them off then had fun adding the church name, angel moroni etc. (oh and notice the "G" on the mtn in the background, totally not to scale but i wasn't gonna make enormous mtns. there is a Y by the football stadium too)
I decided to get ambitious and make a car-mat for my son this year. I originally just bought a car-mat from ikea but then before I opened it I looked online to remember what kind of images were on it- and realized it is not as cool as I thought. I am sure it would have worked just fine but what's the fun in something that's not homemade right? The problem is I get super excited about something, go buy all the supplies, then have to buy a million more things because I didn't think through everything the way I should have, and then I get half way through and am totally burned out and wish I never started. Live and learn, live and learn. I think overall I am happy with how it turned out and the fact that he was actually really excited about it on Christmas morning, made all the effort totally worth it.
The main goals of this project were
-center the mat around places and things that he knows from his daily life- including... walmart, target, the mall, church, temple, community pool, football stadium, basketball court, our house, grammy's house(complete with hottub in the the backyard), grandma's house, a construction site etc. That means that not everything matches up perfectly and is not all to scale but who's counting!?
-make it last past Christmas Day- the mat itself is all just fabric and can be thrown in the washer if needs be and just folds up to be stored wherever. Any problems can be fixed with a little stitch or two. The places can be changed over time as life changes.
-make it 3-D (2-D? uh pop up? you get the point...) so he can actually play with everything instead of just driving over it all. Everything can be moved around so if he gets bored with the same old set-up he can just create his own.
sooo... here it is!
Wednesday, December 30, 2009
Christmas Catch-Up (nat)
Now that I have a camera again(thank you Santa!) I can finally post a couple Christmas Projects to get things up to date! Yahoo! So here's just a few...
This is a little project I did for my mom- since none of us kids live close by I got everyone to write at least 20 reasons why we love mom! So when she wishes we were closer she can look through and maybe it will make the distance just a little easier.
I just printed them all out on cute coordinating scrapbooking paper, added some puffy stickers that spell out F-A-M-I-L-Y and a little ribbon. SO cute and so sentimental. It was a hit!
Just a simple decor project- picked up these hideous blocks at a local thrift store for less than 2 bucks, sprayed them white, added scrapbooking paper, letters, and mod podge to finish things off. The great thing is I can turn them all around and do another word like BOO for Halloween. Love a cheap fix!


This is a little project I did for my mom- since none of us kids live close by I got everyone to write at least 20 reasons why we love mom! So when she wishes we were closer she can look through and maybe it will make the distance just a little easier.
Labels:
christmas,
crafts,
gift ideas,
mothers day,
thrifty finds
Friday, December 11, 2009
I so want to do these (nat)
There are a million projects out there that I always want to do!! AHhh I can't keep up. Saw this one today though over at The Crafty Nest. Love em'! So cheap, and so cute!

Wednesday, November 25, 2009
Cute Country Christmas Wreath (manda)
1 24" wreath
5-7 cut artifical poinsettia picks
5-7 pine cones
6 yards of ribbon of choice
assorted nature of other picks - only about 3
raffia
Hot Glue Gun
wooden dowels
(working in odd numbers helps make a prettier presentation)
Make a large bow with the other three yards of ribbon. Wire this bow to the wreath, to help it stay in place.
I than added a few holly berry picks and raffia for a little accent.
Attach the decorative plaque using small wooden dowels, glued to the back of the plaque. Wire in place.
Tuesday, November 17, 2009
Book of Mormon Stories for Kids
As some of you may know, I created an interactive Book of Mormon Stories book. For quite some time I have had a post all about it on this landing page. Although this post is dated 2009- when I first made the book, it has only been in the last two months (feb. 2012) that I have been encouraged to make this book available to everyone thanks to pinterest and other resources!
Because I never planned on making this book for people beyond my own family/friends I didn't use original artwork/images which is why I can't currently give it to or sell it to anyone. So, I am currently working with a children's book illustrator and am working to get the book published or available through a downloadable PDF file or something similar. Hopefully soon I'll have something available to everyone!
I will post any updates or information on how to get your own copy here so please add this page to your Google Reader! I can't thank all of you enough for your interest and encouragement. Please feel free to email me if you want more information or have any questions. Thanks!!
Sincerely,
Natalie
ccsnatalie@gmail.com
UPDATE!!
Thanks so much for your interest in this Book of Mormon book! I am happy to report that after several months, one illustrator, a few meetings with Publishers, and one etsy shop later- we have a book available for purchase! We took all the ideas from my original book and created a version now available through Etsy. If you decide to purchase it, we email it to you as a PDF file that you can print out and decide what you want to do (bind it, turn it into file folder activities etc.) with it, detailed instructions are attached. This book has the first 9 stories of the Book of Mormon and coming in late February or early March we will have volume 2 with the last 9 stories available as well.
Here is the link to this book on Etsy
https://www.etsy.com/listing/116055936/interactive-book-of-mormon-for-children
The Shop name is Book of Mormon for Kids
Thanks again!!
Any feedback you have or questions are great! Feel free to email me at ccsnatalie@gmail.com. Thnx!!!
~Natalie
Christmas came early!! (nat)
Ahh don't we all remember back to the furniture we got as newly weds, where at the time we thought it was so great and just so cute!? Wow, its nice to know that we can all upgrade in life. Here it is, our old entertainment center. Bought 6 years ago with wedding gift cards at walmart for 100 bucks. I really did like it. I liked it even better when I bought an Ikea curtain panel and put it in the glass to hide all the junk we stored in it. But... after a few moves, the "wood" on this thing just wasn't surviving. The tv totally started leaning to the right and having busy boys made it so i had practically no little accessories all over. Sooooo when my hubby decided he was ready to splurge on a new TV i demanded a new console.

Laundry room/crafty nook before...
Wednesday, October 28, 2009
$2 Halloween Costume (nat)
Over at the DIYshowoff they are doing a halloween project show and tell party so I thought I'd link up and try this whole linking thing out! This is about all I've had time for this Halloween! In the past I have spent weeks thinking about what I want my little guy to wear for Halloween and this year, with everything I've had going on I totally procrastinated and didn't even THINK about what to do for Halloween until Sunday night and then I found out we had a party Tuesday morning. Ahhh no time to go buy something, nothing can be shipped that fast. So I had to once again get resourceful. Here is what I came up with. I think it turned out pretty darn cute!
This became...
Once I padded the inside of the hat he loved it! Oh and I made the little candy bag out of a bag of sugar we had, glue, and mod podge. Halloween success!
Saturday, October 17, 2009
A little texture to my magnet board
Thanks to this great blog that is stuffed full of fun ideas, I came across this post where she talked about seeing this chair in Better Homes and Gardens. I thought it was such a fun idea and a great way for me to put all my random scrap booking letters to use. So I took this photo and used it as my inspiration for a re-vamp on my really boring magnet board. We are linkin up over at thirfty decor chick for the before and after party too!
See- I told you it was really boring! One of the first decor items I got in the 2nd apartment we ever lived in. It started out plain wood, then got painted black, then brown, it needed some serious life put into it.
So I gathered all the random scrapbooking letters I have, which i don't even know why i have them because i don't scrapbook- it takes me WAY too long to finish one page. I had a few of these wood letters too and just cut some of the edges for the whole- going off the page look.
Here it is with all the letters added. I actually think it looks super cute this way and it would be really fun for like a playroom or little kids room but since it's going in my family room and i didn't want it to distract from the pictures it got 2 cans worth of white paint. I love that this project only cost me 2 bucks- gotta love spray paint for 96 cents!
Oh and I used hot glue to put everything in place. Some letters were sticky on the back but I just wanted to make sure they were all stuck on and not going anywhere
Yeah it took a lot more paint than I thought it would to cover the brown and all the colorful letters.
Tada! Ooooo, Ahhhh
Then I stuck all my pictures and magnets back on and decided I was so done with the magnets now too. Scrapbooking paper just glued on was not working for me anymore.
So I just covered them in scrap fabrics I had instead, I love an easy facelift!
I especially love that it makes the pictures stand out so much more now. Ahhhh LOVE it!


Subscribe to:
Posts (Atom)