Pages

Showing posts with label bedroom decor. Show all posts

Saturday, October 29, 2011

Quick Fix

I think this dresser is the very first piece of furniture we ever spray painted-about 7 yrs ago, in a church parking lot b/c we didn't have space at our apartment. It used to be banana yellow and white, from Grandma. It's cheap but for now it gets the job done. When we painted it white I painted the knobs black to go with some other dresser we had at the time. 7 years later, the knobs were driving me crazy in our room because they look so cheap. So a few months ago when I was roaming around in an antique shop- I happened upon these knobs. Nothing too fancy but metal instead of wood and at 50 cents a piece I knew it would be a good upgrade! 

 Of course, I didn't take a picture til half way through- so now u can see the difference
 After
 A little DIY styling on the top- the S is from Hobby Lobby at 50% off it was $5, the frame was something I had, and the stencil print I did myself with some butcher paper and a sharpee, books I gathered from around the house

Wednesday, October 19, 2011

Bedroom Details: THE BED!

Well our bedroom has finally come together one piece at a time. It's not the most amazing thing in the world, but without spending much money- it has come a long ways! Instead of doing one mammoth post, I thought I would break things down a bit. So first up and most exciting was THE BED! Here is what we had when we moved in- white walls, no molding (u can see where we started doing molding in the top left corner) a brass headboard we painted black years ago, old bedding etc. 

 After scouring KSL and trying to find a good deal on beds, I came across Ana White's site, and loved the farmhouse bed. It's been floating around blog land for awhile but it really is perfect. After showing the plans to Paul-one night he just packed up, went to the store, came home with all the supplies, and only a few hours later  he had totally completed the headboard! I was shocked! I knew he was a handyman, but holy moly- I am so lucky :) It was a good excuse to get him the drill set he's always wanted, and if that means he'll keep up the projects then that's fine with me!
I think it only took him one more night to do the foot board and rails. Then it took me 3 times that long to fill all the holes and paint. It was kind of a beast to paint actually, lots of primer and paint. I do love how it looks unfinished in these pics though.
 
  Here it is when we first moved it into the room. I just kinda threw the bedding on and it's not looking great. But at this point we did have the crown molding up (ALSO thanks to Paul, ok I guess I filled all the holes and painted too) and the wall color was up. But still lots to work on--- notice the way too short nightstand and hideous puke orange chair (no offense to Grandma) --- these eye sores will be addressed in upcoming posts!

Thursday, June 16, 2011

Sunburst Mirror for the Master

Sunburst mirrors have been all the craze for the last year and then some... so I never wanted to do one, I usually wanna stray from things that are too trendy and these mirrors are EVERYWHERE. For example...

Addicted to decorating...
 The Lettered Cottage
 Centsational Girl
But when I started doing our bedroom, there was really just the perfect empty spot over one of our dressers so I thought- heck with it, I'll do it anyway. But... everywhere I looked were mirrors that were missing something or not necessarily the way I would want to do it. The ones above were some of my favorites/inspiration. I like the shims idea, I like the paint sticks but I always feel like the mirrors look unfinished or off proportion. So I just ventured to a few craft stores to see what I could come up with to get it just the right way for me!

Shims... about $1.50 @ Home Depot
 I found a bamboo roller shade at a thrift store for $4.00
 Round clock face, unfinished craft mirror, 10" embroidery hoop
 Laying it all out
 Hanging it up!
Still need to accessorize the dresser- but for now, I love it! 

Friday, July 2, 2010

Little Girl Room Makeover


The boys new bunk beds.

Thanks to some very generous friends we were able to get a wonderful bunk bed set for my boys for free. They are wonderful. Of course they are also the new jungle gym. While the boys adjusted to sleeping together in their new shared space, I got to relish in finally creating a little girl wonderland for my daughter. This is the first time in her short life that she hasn't shared a room with a boy. This monumental occasion called for pink! She wanted a room that was pink and green and I was happy to oblige. We have had fun decorating together. I have a few more ideas for redoing the desk and dresser to tie the room together better but in the meantime she and I have been having fun. This is what we have so far:
This is her room when you enter it. We rearranged things a little to make room for larger furniture pieces. The walls were painted Laura Ashley "Rose" and the trim was painted white.
The bedding I got for a steal at TJ Maxx and she and I both love it. Today she got mad at her brother for coming in to her room with sticky fingers- in case he touched her quilt. The yo-yo bed skirt I made my hand a couple of years ago but it didn't work very well with her old bed. I think it looks great with the new one.
I had some scrapbooking frames left over from another project. So we spray painted them pink, added coordinating scrapbook paper and attached her initials. - It was a great touch and too cute.
I found these shelves at Lowe's on clearance. We both loved them. They are perfect for all of her little knick-knacks.
The curtains I made by hand from a simplicity pattern. The fabric has a delicate little polka-dot pattern and I made the tabs in a coordinating fabric that I had on hand. I love being able to make 4 curtain panels for $30! I think they finished off the space very nicely and softened it up.

The little girl in me definitely came out working in this room. There are still a few things that I would like to do. - But we both love it.

Thursday, January 7, 2010

Boy's Room Redecorating (manda)

After 3yrs. of living in our house I have finally gotten around to the last few rooms that I need to paint and decorate. (Of course the saying goes- once you finish painting you move and start all over) This includes my children's bedrooms. I wanted to redecorate my oldest son's room before purchasing bunkbeds and moving his little brother in with him. So in my efforts to redorate and create a room that two boys would eventually share this is what I came up with.

This is the before picture. My son was 5 at the time so the primary colors worked. The furniture is all a nice bedroom set that we inherited from my in-laws, minus the dresser which is from ikea. Now that everyone is older I needed something that my boys could grow into but would still be fun for young boys.

I started with painting the room. A friend of mine had done a similar wall color technique but with she painted the walls to chair rail height with two different colors of blue. I wanted something a little brighter, but still wanted a dark blue color. So I opted to go white on the ceiling to wainscoat height (1/3 of the way down the wall) and do blue from there down. I used my favorite white Home depot's Cotton Whisper by Behr and the blue is Valspar's Deluxe Eddie Bauer Home- Denim. The is a pretty easy process. I painted the white first and just went down far enough to ensure that it would be below where I wanted the blue. I then used a chalk line to mark the walls, taped the line, and painted the bottom -denim. The trim and windows were then also painted to match the ceiling.
It was definitely time for a bedding update. The old quilt was frayed and much too little boyish. Knowing that I would be making bedding for bunk beds I did everything x 2. I found 2 Ralph Lauren Down Alternative comforters at TjMaxx for $26 a piece. A great deal! Then I needed to cover them. My son wanted red so after much searching I finally found a set of red sheets by Woolrich on clearance at a local overstock store and bought two. I had two sets of knit sheets already. I sewed the red sheet to the blue- making the duvet cover reversible and whoola! I am hoping to mix and match the sheet sets on the bunk beds to make the spaces coordinated yet individual. The accent pillow was $5 and is a Waverly blue ticking stripe.
My window treatments including denim valances and red roman shades finish the look. My husband helped install shelves over the desk for my older son to keep things away from his brother and help clean up the clutter. I would like to find a night table to match the other furniture, that will have to be my next project. My clever sister also suggested adding dresser pulls to dress up the dresser. I will probably do that too. We are all very happy with the new room. My son is the most thrilled of all.
Posted by Picasa

Friday, October 2, 2009

Hello Beautiful Bedroom! (nat)


After

I know there's a lot of flower patterns going on on the bed but i like it. i found the two white and blue pillows on clearance at TJ Max for 7 bucks for the pair. they are actually chair cushions, i just cut off the ties. the bedding is half of what we had before (shams, bedskirt) and half of what i mixed with our guest room bedding downstairs (pillows, duvet cover). I did the little saying thing over the bed. 3 canvases from big lots, just printed out words from the computer, scrapbook paper and mod podge. not my best piece ever but i guess it will work for now. i wanted something with a personal touch.

Before...

After

Before...

After

and here's the story on the accessorizing, i want a new dresser to replace the tall one- its a piece of junk, but what can ya do. this dresser if you look back at the photos had out dated round black knobs so this was my one expense really was updating the hardware. i really like what i ended up with and think it makes a world of difference.

These were the frames that used to be above the bed. i had a calendar given to me for my birthday that has these fantastic photos. i really wanted to display them with it still flowing with the room. I do need something on the dresser between it and the photos but i haven't gotten there yet. i'll dig around the house and see what i come up with. something simple but it needs something. long term i will probably take the mirror that originally attached to this dresser and frame it out with molding for a mirror or something

and this is my favorite piece of the whole room. if you look at the before photo--- the top of this dresser is always the dumping ground and i've tried every box, bowl, etc. i could find to keep this area organized and nothing has worked. so i was in savers like 2 days ago and they had this cutest file box with drawer that is super sturdy wood and the color was perfect! love the shabby chic look. oh and it was only 4 bucks- love that!

Tuesday, September 22, 2009

Boys room re-do (nat)

As soon as we found out we were having another boy I started planning out what I wanted to do to make the nursery into a cute boys room. So without major changes (wall treatments or re-painting etc.) I re-vamped the room to make it work for 2 boys. After about a million projects I think I am satisfied. Probably a few more things will be thrown in along the way but for now I'm happy. When we bought the house this room was painted a dark army green, it looks lighter than it was in the photo. So thanks to the help of my dad it has a totally new look!

Before...
After
Details of the different projects are below.
To the left- changing table, pics, diaper shelf etc. This changing table is just a dresser we begged off of my husband's grandma when we were snooping in the basement! It was painted white and mustard yellow. With our first, I just repainted it and painted the knobs- gotta love it when things are free!

To the right- rocking chair, shelf, reading/toy area
This rocking chair I picked up with our first too at DI (local consignment shop) i think it was like 20 bucks. I touched up the white paint and made new covers for the seat cushions that you can un-zip, remove, and wash. I still need to make a pillow for this chair and a pillow sham for the bed... hmm someday. Oh and I used to have these letters above the bed done in really cute scrap booking paper and ribbon but i can't find a picture of them anywhere. I haven't put up new letters yet, I'm waiting til we pick a name for baby #2!

Now here are some of the projects close up- I had a lot of fun with these pictures. I love the look of pictures stretched on canvas but it is soooo expensive. So I got creative and bought 3 canvases at joann's (at 40% off) and then had pictures printed out on computer paper at kinkos (like 1.50) then I used good ole' mod podge to wrap the pics onto the canvas, just kind of like you are wrapping a present. Not perfect but definitely worth the price tag. I think it turned out pretty cute. These pictures are what inspired a lot of the room. Add some cheap square frames from the dollar bins at target, scrap booking paper, and vinyl lettering- voila

I tried to do the mod podge streaky to make it have more of that canvas/rustic effect. Hard to tell in a picture but you get the idea.

Onto the sewing projects- I made the duvet cover. Couldn't find anything I liked in the stores at the price I like to pay so I made one. Just used an inexpensive sheet on the back, and two coordinating fabrics for the front, added some buttons to close it all up. The great thing is since I change my mind so much now all I have to do is make a new cover instead of buy a whole new set when I get sick of this one. Oh yeah and if you look back at the first couple pics I made the window treatment too. It keeps the heat in and the light out perfectly at nap/nightime and is just rolled up during the day. Here's a tutorial if you are interested in making a similar window treatment for yourself!

I re-did this shelf awhile ago but it had like stars and moons cut out on the back which I got sick of so I took some cardboard, covered it in fabric, and put it on the 3 back sections. Perfect size for housing diapers

Finally, stuff on the shelf. Found these boxes super cheap at Michaels, covered them in scrap booking paper etc. Not the greatest close up but whatever.

The great vintage car my mom bought me for my birthday and a cute pottery barn plane I got at the after christmas sale since it's actually an ornament.


Master bedroom remodel (manda)

Before...

Okay so I got lucky the other day at the unfinished furniture store. They were having a 50% off sale. So I was very excited to find a already finished black framed mirror and an unfinished night stand for $140 total. So having found these pieces I think I know have a plan for my bedroom.

I am going to paint the walls Celtic Grey, it is a soft gray.green color. I am going to try and refinish my dresser a nice ebony black stain, with some distressing to match the mirror I purchased to go above it.
I am having trouble deciding what to do about my cedar chest, but the color and hardware will definitely be changed. Any suggestions? I don't want everything black. I like a more subtle mis matched look. As long as they match stylistically.
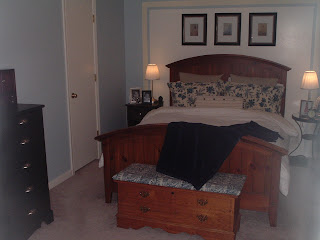
The bedding I am going to do in cordinating creams and blue grays to match the wall color. I am also going to change the curtain by adding a roman shade to simplify the look and let in more light.

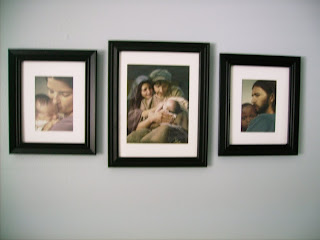
The bathroom I plan to paint a nice creamy tan, I am going to attempt the paint the laminate counter top as well. I know it can be done. I just need to find the book on how to do it. I think I might also change my wedding pictures for something in a nice b&w print, maybe Paris?

When wedding pics are 10 yrs old. It is time for a change.

Please consult my previous blog post of bedroom post to get the idea. I am also going to change the bed hardware but I am not sure with what- definitely a nickel finish of some sort.

Would love to hear comments, suggestions, etc.
Posted by Picasa

So I have been working on my bedroom for a week now and I have a few things done. First off check out my family blog to see the bathroom vanity before and afters. I have successfully painted my bedroom but that was a panic because I got it all painted and thought it was too dark so I spent the next day determining solutions. I poured through faux finishes and fabric ideas and finally decided that instead of painting the darkest wall as an accent ( I was worried this would make it look like I forgot to paint a wall) I decided on what you see here. I am now working on trim and paint the bathroom while my husband helps with furniture and doors. I think I may have a decent before and after at the end of the month. What a project!

The bedroom is done and I know of at least a few people who wanted to see the end result of my hardwork, so here you are. As doing all of this sort of makes me feel like I am on HGTV or something I shall give you the play by play.
I made the pillow shams and window treatments myself with fabric ordered online and from Jo-ann's.
The framed art above the bed is a series work of the Rouen Cathedral by Claude Monet. I framed and matted them myself. The frames are from Micheal's.
The mirror and the wooden nightstand came from the Unfinished furniture store. The nightstand is stained ebony. The dresser was sanded and painted with an oil based primer followed by an enamel acrylic top coat, which went on very smooth and we are very happy with the result.The polished nickel hardware came from Lowe's.
The lamps and the metal end table are from Ikea.
The room color is Cloudy Day by Behr and the trim is called Cotton Whisper also by Behr.